ComfyUI Integration
Use your own computer's AI for image generation
Overview
ComfyUI is a free tool that lets you run AI image generation on your own computer. By connecting ComfyUI to Genko Comic, you can use your own custom setups for creating images, editing them, and more — all using your computer's graphics card.
What You Need
- Latest comfyUI installed and running on your computer (see ComfyUI on GitHub or ComfyUI Easy Installer )
- Python 3.x and a graphics card (NVIDIA recommended)
- A ComfyUI workflow saved in API Format (.json file)
Step 1: Run ComfyUI with CORS
Genko Comic runs in your web browser on a different address than ComfyUI. By default, ComfyUI blocks requests from other addresses. You need to tell ComfyUI to allow requests from Genko Comic.
Why is this needed? Web browsers have a security feature that blocks websites from talking to other servers unless those servers say it's okay. Since Genko Comic runs on https://genkomik.com and ComfyUI runs on http://localhost:8188, ComfyUI needs to be told to accept requests from Genko.
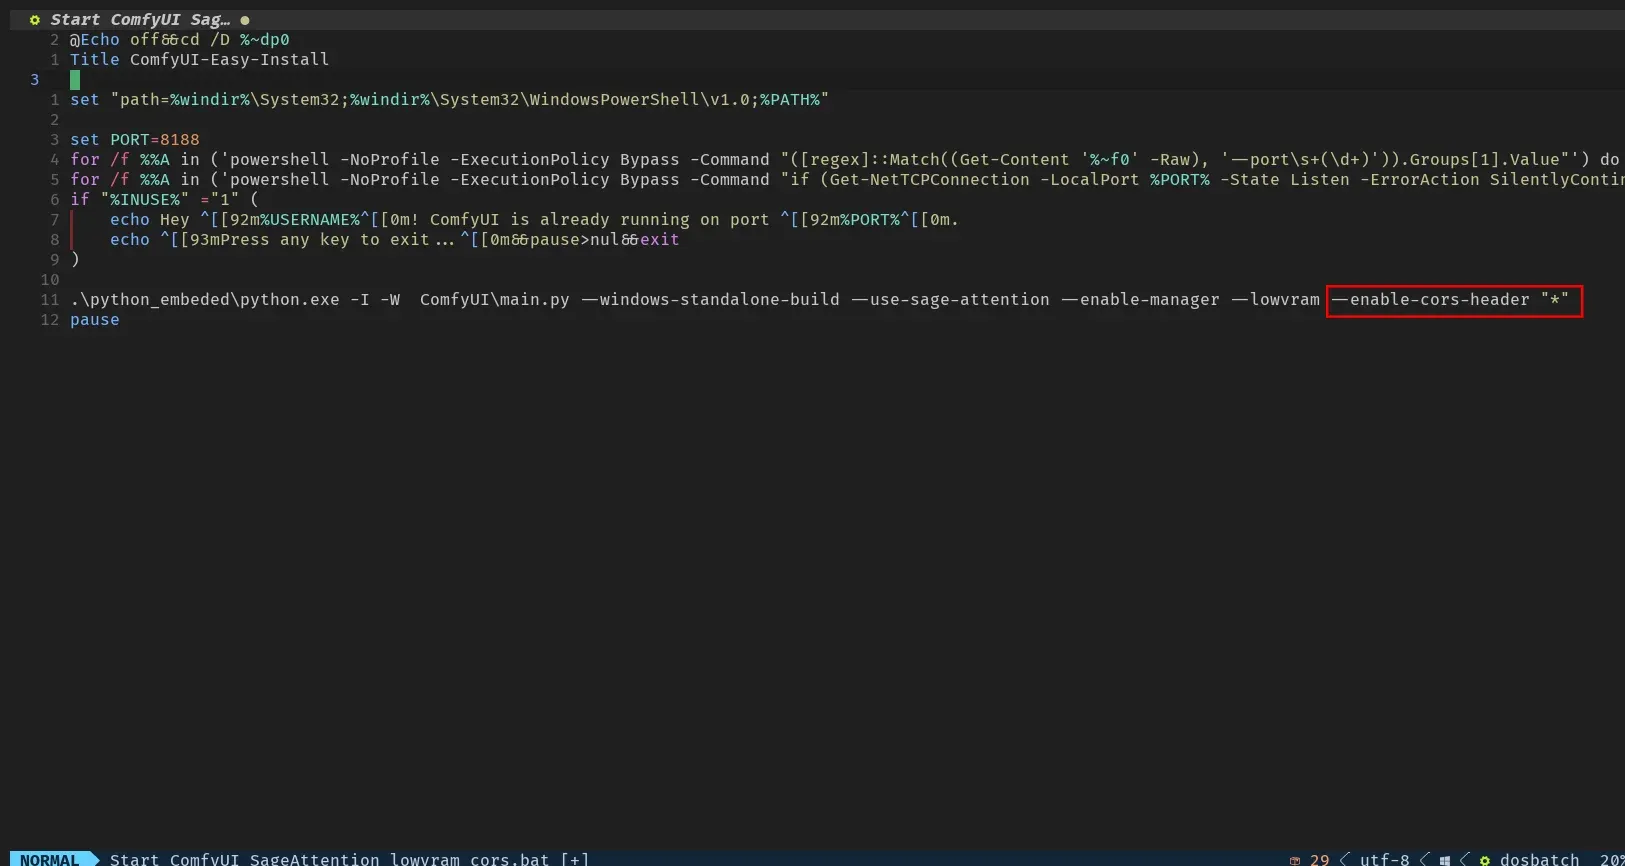
Start ComfyUI with the --enable-cors-header setting:
python main.py --enable-cors-header "*""*" value allows requests from any address. For tighter security, you can use your Genko Comic address instead, like --enable-cors-header "https://genkomik.com".If you use the ComfyUI Manager or a launcher, look for an option to add extra settings and add --enable-cors-header "*" there.
Step 2: Turn On Developer Mode
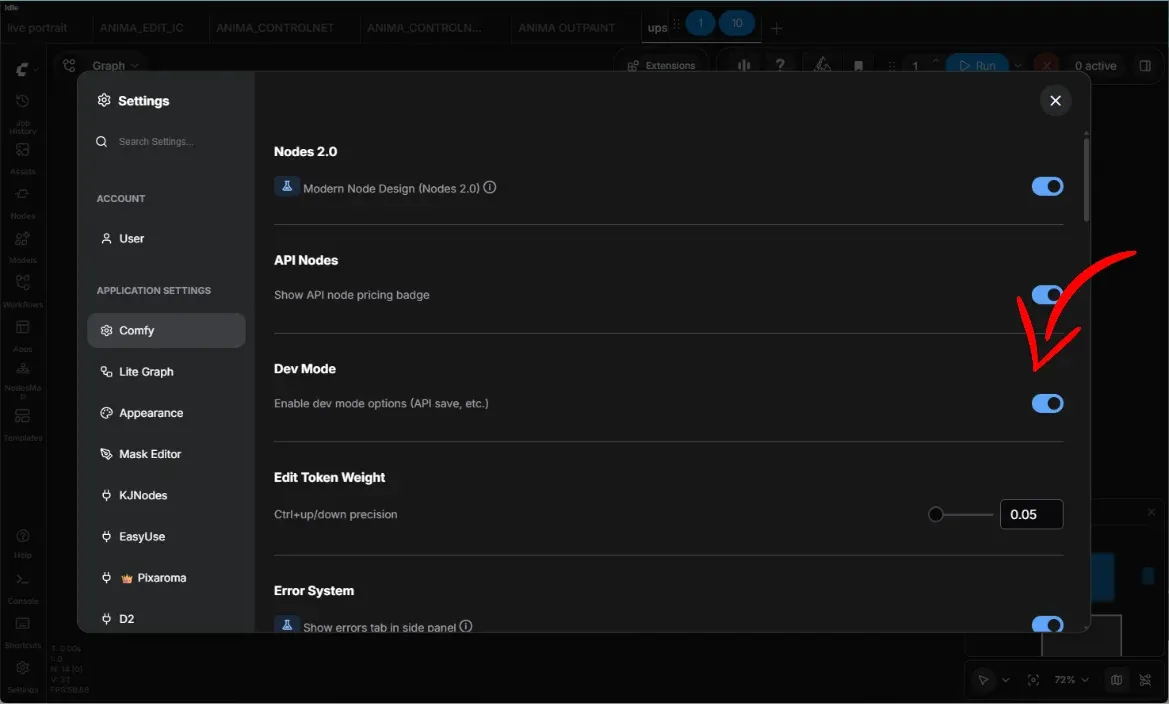
To save workflows in the format Genko Comic needs, you must turn on Developer Mode in ComfyUI:
- Open ComfyUI in your browser (default:
http://localhost:8188). - Click the gear icon (Settings) in the top-right corner.
- Find and turn on the "Dev Mode" switch.
- Close settings. You will now see a "Save (API Format)" option in the menu.
Step 3: Save Your Workflow as API JSON
Genko Comic needs your workflow saved in API Format. This is different from the regular workflow save.
- Build your workflow in ComfyUI.
- Click the menu icon (three lines) in the top-right.
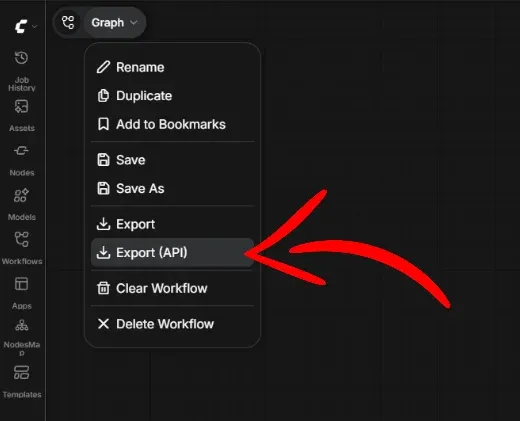
- Select "Save (API Format)". This downloads a
.jsonfile. - Repeat for each workflow type you need (Generate, Edit, Mask).
Step 4: Required Parts by Workflow Type
Genko Comic checks your uploaded workflow file for specific parts. What's needed depends on which workflow type you're uploading. Each workflow type is uploaded separately in the Genko AI Dashboard.
Generate Image Workflow
Used for creating images from text. This is the simplest workflow.
What you need:
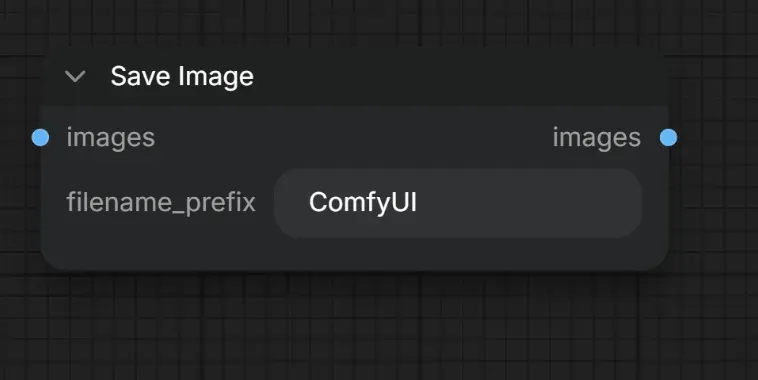
- SaveImage — A part with
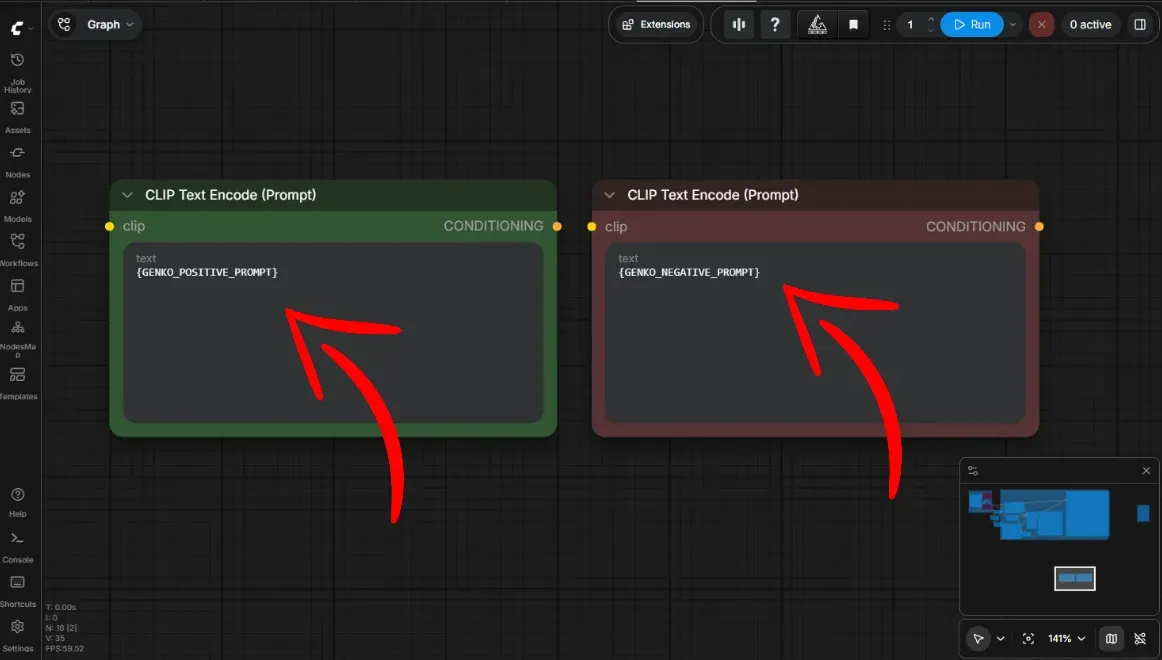
class_type: "SaveImage". This is where generated images are saved. - {GENKO_POSITIVE_PROMPT} — A part (usually a
CLIPTextEncodeor similar) whose settings contain the text"{GENKO_POSITIVE_PROMPT}". Genko Comic will replace this with your prompt.
Extra mask requirements:
- Your workflow must have a
LoadImagepart titled"GENKO_IMAGE_1"with its mask output connected to any other part. In ComfyUI, this is shown as an input array[nodeId, 1]— meaning "take output slot 1 from another part." Genko detects these connections automatically. - Usually, you connect the
LoadImagepart's output to anImageToMaskpart (to extract the transparent area as a mask), then connect that mask output to your editing orSetLatentNoiseMaskpart.
LoadImage part and title it "GENKO_IMAGE_1". Connect its output to an ImageToMask part, then connect the mask output (slot 1) to your editing part's mask input. Genko will inject the source image and mask automatically.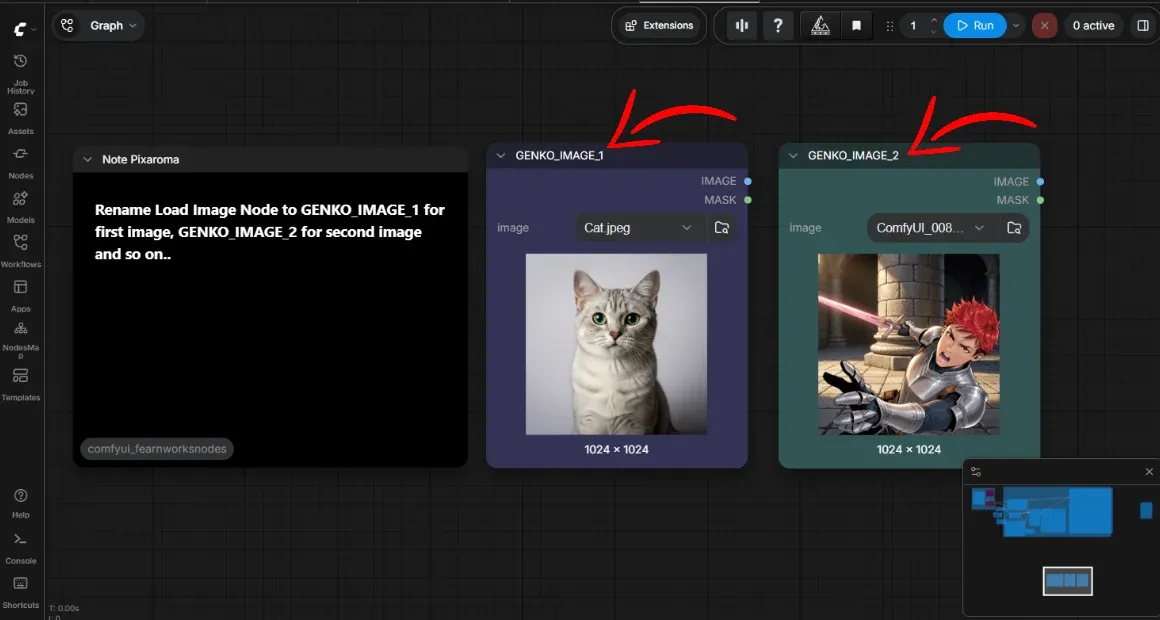
Parts Naming Summary
| Part Name | What It Does | Needed For |
|---|---|---|
SaveImage | Output part | All types |
{GENKO_POSITIVE_PROMPT} | Your prompt goes here | All types |
{GENKO_NEGATIVE_PROMPT} | Things to avoid go here | Optional (all types) |
GENKO_IMAGE_1 | LoadImage part for input image | Edit, Mask |
GENKO_IMAGE_2+ | Additional input images | Optional (Edit, Mask) |
Step 5: Set Up in Genko
Now connect ComfyUI to Genko Comic:
- Go to the AI Dashboard at user dashboard .
- Click the ComfyUI Setting tab.
- Turn ComfyUI Integration ON.
- Enter your ComfyUI address (default:
http://localhost:8188) and click Save. - Wait for the status to show Connected (green dot).
- If your ComfyUI uses a password, enter the API Key (optional).
- Under Generate Image Workflow, click Upload JSON and pick your generate workflow file.
- Repeat for Image Edit Workflow and Mask Edit Workflow.
- Pick the uploaded workflow from the dropdown for each type.
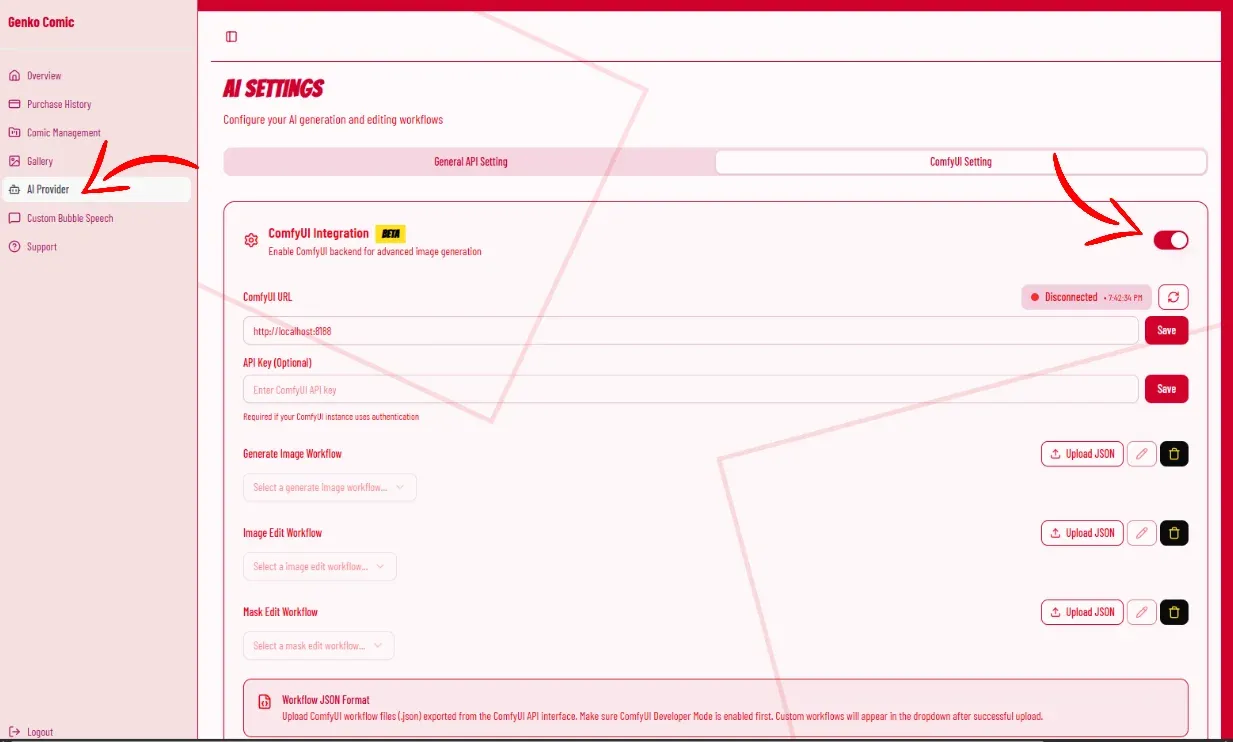 You can upload multiple workflows for each type and switch between them using the dropdown.
Troubleshooting
ℹ️ Connection Problems- If the status says Disconnected, make sure ComfyUI is running and the address is correct.
- Check that CORS is turned on — make sure you started ComfyUI with
--enable-cors-header "*".
ℹ️ Workflow Upload Errors- "SaveImage node not found" — Your workflow doesn't have a
SaveImage part. Add one in ComfyUI. - "{GENKO_POSITIVE_PROMPT} not found" — No part has the
{GENKO_POSITIVE_PROMPT} text. Add it to your prompt part's text field. - "GENKO_IMAGE_1 not found" — For Edit/Mask workflows, you need a
LoadImage part titled "GENKO_IMAGE_1". - Make sure you saved using "Save (API Format)", not the regular save.
⚠️ Developer Mode Not ShowingIf you don't see "Save (API Format)" in the menu, Developer Mode is not turned on. Go to Settings (gear icon) and turn Dev Mode on.